QuickBooks Tip 5 - Entering A Bill
Welcome back to our Tip of the Week series. Today we are going to look at how to enter a bill in QuickBooks. Tracking bills can be a huge hassle but QuickBooks makes it easy to enter, pay and track bills. On the Home Page, select “Enter Bills.” There is plenty of information you can enter but here is an example of completed bill with all the requirements filled in.
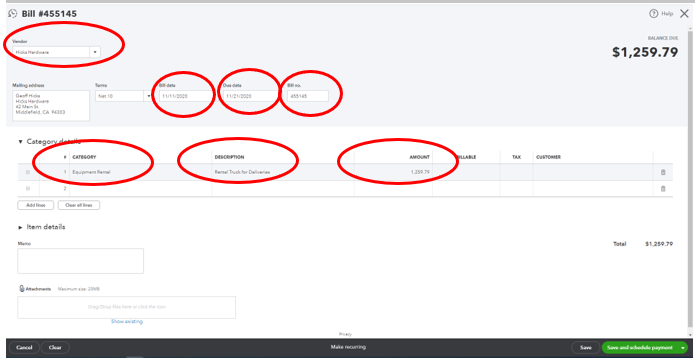
Make sure you have your vendor listed as well as the bill date, due date, bill or reference number. QuickBooks allows you to record the details of the bill two ways. Depending on the bill and the type of business you have, you will use either the “Category Details” or the “Item Details.” The example above shows a sample bill for a business renting a truck for deliveries. They use the “Category Details” line to record the category, add a description (not technically necessary, but should be used to differentiate between bills in the same category) and the amount.
The other option when it comes to recording the details of the bill is to use the “Item Details” line.
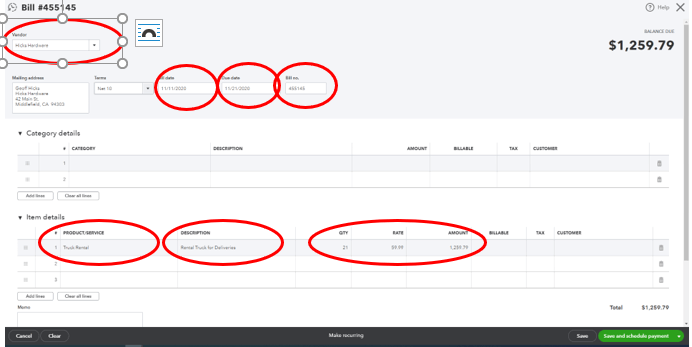
Here you can see the same bill is being recorded using the “Item Details” line. Normally, a business would use this format to track products that will be resold and you need to track inventory. In this example, they used it to show that the rental was 21 days at a rate of 59.99 per day. You can use the line in this way to track services that are itemized or have quantities in the transaction listed.
The boxes circled represent the info you should always record, but you also have space to record if this is billable to a customer and to place the customer info in as well. If you have a digital copy of the invoice, it can also be attached.
Want more tips on using QBO for your small business? Subscribe to our mailing list or follow us on Facebook, Instagram and Twitter!